Showing posts with label Home. Show all posts

Friday, May 5, 2017

Everyone needs an Ottoman, or is that a Pouf? I've got the DIY!

DIY No Sew Ottoman ... or is it Pouf ?


Ahhhhh, feet up .... Nice!

I've done the searching for you, and wow - there are a lot of DIY ottomans and covers out there in internet land. But I was looking for a NO sew project. All of the poufs could also be made with outdoor materials to add to your outdoor space. Add your imagination and the possibilities are endless!

Yes, yes I know, Pouf is really spelled Pouffe ... I like Pouf!
 
I just love this DIY! Fun and colourful!! Thanks Mark.
 
 
One of my favorites is this bohemian style, easy no sew ottoman on Mark Montano's YouTube
channel. If you haven't seen his channel - you need to check it out!!  Mark has so many amazing DIY'S!  Clear and simple instructions. I've created many of his DIY'S and they have turned out wonderful! You can find Mark's DIY,  "EASY NO-SEW OTTOMAN" here.


DIY Arrow Floor Pouf


Can you draw a straight line? Yes? Well you can paint these arrows!
This is a wonderful drum style ottoman, simple sewing and hand painted.
Find it here. 


 Poufs for the Kids

This one is for the sewing enthusiasts ... a beginner sewing project, easy peasy!
These handles make it easy for the kids to move these around.
Even though they are targeted to kids, great for adults too. I love how you can just grab
the handle and go ... another room, to the car, absolutely anywhere!


Grain Sack Pouf

Lazy day pouf, squishy, puffy and oh so relaxing.
 
Don't these just look so inviting?
These require bean bag fill, which can be purchased on amazon.com or at your local arts and craft store.


Cover an Ottoman - 5 easy steps!

Easy Easy Easy ... did I mention 'Easy"? And No Sewing.
 
Grab some of your favorite fabric, scissors, a staple gun and some measuring tape ... and that's it!
That's right, no sewing.


Tuesday, April 25, 2017

Try Zentangling

Introduction To Zentangling


Put simply, Zentangle is a simple form of doodling.


Ok, this one is a little advanced...but it's beautiful!

 
A Zentangle is an abstract, patterned drawing.
 
It’s super easy! Anyone can do it, adults and kids love it, it brings about a sense of calm and relaxation.
 
Even though there is a specific Zentangle method that was created by Whitinsville residents; Maria Thomas and Rick Roberts, Zentangles can be created on any surface and any size.
 
If you choose the actual Zentangle Method, the tangle is created on a 3.5" square paper tile.  There are many tutorials, that teach this method.


Here is a simple tangle, created on a 3.5" paper tile - the Zentangle method.


Or you can tangle on any surface you choose.


Tangle anywhere!
 

Decorate a Picture Frame.


Tangle someone's initial, and frame it as a gift!

The art of Zentangle is being taught all over the world. In schools, primary, high school and college. Tangling is also taught in hospitals to help people recovering from physical and psychiatric health issues.

Creating "tangles" has been proven to boost self-esteem, confidence and focus, and even a cure for anxiety. It has an incredible ability to be both meditative and therapeutic. There have even been studies done linking Zentangling and mindfulness. The activity of tangling has shown how powerful and peaceful it can be for people to embrace an inner creativity that they never thought they possessed.
 
Increasing focus, attention and creativity, Zentangle provides artistic satisfaction and an increased sense of personal well being.
 
There are many tutorials online for all styles of Zentangling. 


You can even get certified as a
Zentangle Teacher; CZT.
For more information on CZT training  click here.

This site also offers a ton of instructions for learning to tangle and an almost endless number of step-by-step Zentangle designs.


The official Zentangle site:


Of course there are many tutorials on YouTube, here's one to get you started:


.


Saturday, April 8, 2017

Da'Best Stove Top Blueberry Jam

It's Beautiful Blue, All Natural and It's Yummy as Heck!


Memere's Stove Top Blueberry Jam recipe ... is of course, Da'Best!!!


My Memere and my Mom made this jam often when I was growing up, and it's still one of my favorites. I always have some ready in the fridge. Now, with all the hoopla about the power-house of antioxidants packed into these little guys ... well, time to try some!

It is very very important to use 'WILD" blueberries - these are the tastiest and sweetest.
If it's off season or you just don't have them growing anywhere close to you, they are available at Walmart .... yes, you read that right! I think almost everyone is fairly close to a Walmart, haha.  Their brand 'Great Value' has a frozen package of "Wild Blueberries", and they are actually delicious!

Ok, so here we go.

Not just the best recipe, it's also the easiest!
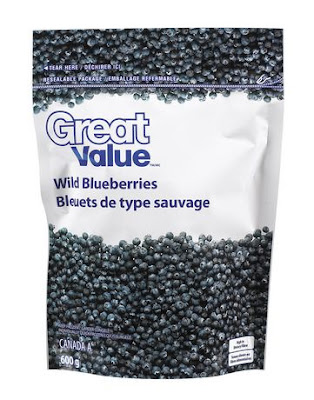
Since it's not blueberry season anywhere that I know right now,
I'll share the recipe I use for the frozen "Wild Blueberries". Again - mine come from Walmart.

Geez, I have to tell you ... I was shocked at how delicious these frozen berries are. Where I live we have lots of northern wild blueberries toward the end of July. I have tried pretty much every frozen brand trying to find sweet wild berries, and these are the only ones that taste as great when cooked!

2 pkj of wild blueberries (each bag is 600g)
2 1/4 c of sugar
2 tbls of real lemon juice
1 wooden spoon - let's be natual
1 potato masher

  1. over medium heat add both packages of blueberries to a medium sized pot
  2. use potato masher to mash berries, easy now - don't pulverize them ... just mash those little beauties for about 2 - 3 minutes
  3. add 1 3/4 c of sugar and stir - saving the remaining 1/2 c for later
  4. add lemon juice, stir till blended 
  5. let simmer at a hot simmer (small bubbles, a beginning boil) for 60 minutes, stirring about every 10 minutes
  6. add the remaining sugar, let simmer for as before for another 15 min
  7. Ok, done! Now you can let it cool down. After cooled I put the lid on the pot and put it in the refrigerator overnight. Then spoon into small fruit sized mason jars. I don't do the formal canning procedure because they get eaten to fast. However, I do put the date made on the lid.

I usually give one or two away, since people are always waiting for the next batch.  Yup, it's that good. I usually spoon it on some toasted fresh bread or warmed scones. 


Mmmmm, looks just right!


Ok, Ok ... I'm off to make some toast.


IN CASE YOU'RE WONDERING ABOUT THE LEMON JUICE 

Why Do You Have to Add Lemon Juice When Making Jam?


Besides the obvious fruit and sugar, most jam recipes also include lemon juice in the list of ingredients. That lemon juice isn't just there for flavor; it actually plays a very important role. Here's why we have to add lemon juice when we make jam.


It's a Matter of pH

When you prepare a big batch of jam, you begin by cutting or mashing the fruit and heating it with some sugar. This releases the pectin that was trapped inside the fruit cells into the jam mixture. Unfortunately, now that the pectin is dissolved and free, the strands of pectin will now repel each other.
The lemon juice will lower the pH of the jam mixture, so it can now assemble the pectin into a network that will "set" your jam.


Yes, you can grow blueberries in containers.

Start early this Spring.


Growing Blueberries in Containers

Top Hat Blueberry is a wonderful plant to grow in a container.
 This year I'm trying to grow some of my own ... even though they grow in the wild here. I just love the thought of having them right in my yard.

What? Share? You're kidding right?!


Oh, and remember who else loves these --- BEARS! So maybe don't place the plant near your house entrance or near where your car is parked...just saying!
I'll post and share my results in a later post.


Blueberries are ideal plants for containers because it's easy to control the soil conditions they like best. Start with a pot that's at least 20-24 inches wide or larger.

Planting tips: Choose a potting mix designed for acid-loving plants like rhododendrons, azaleas, or camellias. Look for a pH balance between 4.5 and 5.5.

Soil and fertilizer: Use a fertilizer designed for acid-loving plants. Apply in early and late spring to promote growth and fruit production, then stop fertilizing for the year. Feel free to occasionally sprinkle used coffee grounds on the top of the soil around blueberry plants.

Pruning and other care: In early spring, prune any dead wood. Otherwise, blueberries need no other pruning unless you want to shape the plant.

Most blueberry plants need one to two other types of blueberry plants nearby for pollination.

If you live in a year-round warm climate, remember that blueberries need cold temperatures for a certain number of hours to produce fruit. Check with your local Cooperative Extension Service to find varieties best suited for your climate.

In general, choose a container variety that is cold-tolerant to one hardiness Zone colder than the one you live in. 'Sunshine Blue' is a good variety for warmer climates; 'Top Hat' is good for cold regions.

Winter care: In regions with harsh winters, move the blueberry pots to an unheated garage, allowing the plants to go dormant but watering just enough to keep them alive. Return the pot to a sunny location after danger of frost passes.
If you choose to leave the pot in place, insulate it with mulch for winter protection.

Tuesday, April 4, 2017

GIVEAWAY DRAW FOR APRIL 2017


THANK YOU SUBSCRIBERS!

Sneak Peek at April's Subscriber Appreciation Giveaway.

 
Remember you need to be a subscriber to be entered in the monthly draws.
As a HUGE THANK YOU to those of you who subscribed to our blog.
To show our appreciation we will be a having monthly, 'Subscriber Appreciation Giveaway'.
For this month, a winner will be drawn April 20, 2017 ... Good Luck!


Thursday, March 30, 2017

he said, SHE SHED


Ladies, ladies ... it's about time!

The She's of the He and She's are claiming their own space.
Creating a magical place of their own.
A place to get away from it all... and it's right in their back yard!

What is it? It's a SHE SHED.

A place to stretch out, sit down or lay down
comfortably. For some it's an art space, a meditation or yoga space, an alone space, a music place, a reading space.

 Do you have a shed in the back yard?  Maybe a shed that needs some repair.  Well, what are you waiting for ... CLAIM IT!

Make it a space that's only about you, capture who you are. Use your favorite décor, colors, drapes, cushions, pillows, pictures, wall treatments - anything goes. What about all those diy's you've been wanting to try?

A place for your books, crafts, candles, incense, yoga mat, whatever you want that brings good and comforting feelings to you.


Maybe a piece of art that speaks to your soul.
Be alive in your space.  Breathe in, it's all about you, no one else - just you!

What about in the trees? Do you have large ones in your back yard? A wonderful place for a She Shed!

I looked through Pinterest at different ideas for creating a She Shed, and it's just crazy how many ideas are there! I could have spent a whole day looking.  There are also an endless stream of YouTube videos to help with your project.
 
This video says it all, have a look:  She Sheds: New Trend Finds Women Constructing
                                                         Space of Their Own  

 Ok now, let's put this on our bucket list!


Week 7 - Journal Prompt

A Tangled Mess

Tuesday, March 21, 2017

Week 6 - Journal Prompt


Snail Mail Challenge

HERE'S A CHALLENGE FOR YOU .... SNAIL MAIL!
 
Are the days of hand written letters and even postcards really gone?
 

"The Challenge"

 
List 4 people in your life that you would like to give a wonderful surprise.


Beginning now, for this next year; at the beginning of each season send someone happy mail - a letter or maybe a postcard.  If you keep a journal or personal calendar, mark it in as a reminder.
You'll make someone's day special in spring, summer, fall and winter!
 
Sail mail is the more thoughtful way to send a message, a greeting or even simply a thank you.
Once you start doing it, you may decide to do it once a month.


Keep in mind, the recipients don't have to live far way. The whole idea is for them to go to the mail and be excited to receive something personal, something someone actually put their physical & creative time into.
 
Who knows, you may even receive one in return!


"Get Creative!"

Personalize the envelope or even the letter.
Think: draw, cut, colours, stamps and ink, stickers, pictures ... get creative!


Monday, March 20, 2017

Where Is Your Bucket List?

Everyone Needs A Bucket List!


Not a list that lives in your mind ... a bucket list that is actually written somewhere.


Recently, I was making a physical list of the things I'd like to do before my life is a memory.
In doing this, I realized I couldn't think of too many -  but I knew absolutely, there were more.

I left my list out where I could see it and what do you know? Yes, as days past more things came to mind and I hurried to write them down. I suppose some had been hiding deep in the back of my mind.  How can we possible focus on these things if we cant even consciously remember them?

Yes, everyone has heard of the 'bucket list', but how many have actually made one?  How many actually lay eyes on it from time to time?  I'm guessing not many. 

Studies show only 8% of people have a physical, tangible goal list of any kind actually written down somewhere.  I'm sure you've heard the saying; 'how can you score a goal without a net?'


You need to WRITE IT DOWN!! I was yelling there, did you hear me?
No matter how trivial or how outrageous ... your bucket list can have anything at all on it.  And guess what? It's a hoot to be able to check something off.


Have fun with it! If you don't have a journal or note book, or Day-Timer you use - maybe create something.

Maybe do some DIY and find an old window with the glass still in or large picture frame and paint it with chalk paint. Perhaps one of those inexpensive plastic/wood framed full length mirrors for the back of a door. Hang it somewhere you can see it often, like maybe your bedroom or home office.

In my art room, I used window trim and sectioned off a large square on the wall and painted the inside with 3 coats of black chalk paint. Now I have a huge area to write ideas, lists and doodle things.  My bucket list is in my journal, but this works too.

There are many different ways.  Maybe a specific area full of sticky notes.  Get creative, search online for ideas.
Just ... do ... it!

Thursday, February 23, 2017

Take Everything Out!

Nothing to Wear? ... Organize!


I'm finally going to do it ... here is the system I'm going to follow:


Empty everything out! This means your closets, drawers and shelves.
Lay it all on your bed, the floor, where ever you can see it all.

Empty everything out. Yes, everything! This means your closets, drawers and shelves.

Lay everything out; on your bed, the floor, where ever you can see it all.

Now .. one by one, go through each item. Only put back an item if you can say YES to these three questions;


Does it fit comfortable and properly? Compliment your shape?

Is it still in good shape? No rips or tears? Unless of course, that's what you love about it!

and last ... DO YOU LOVE IT, or perhaps, is it a WOW on you.


Remember, the idea here is to minimize! This is so freeing ... once you start leaving behind the items you feel just so-so about, you'll be amazed at the wonderful things you actually own that make you look and feel great.
 
Another plus, now when you go to choose what to wear, the frustration of this decision is gone.  Whatever you choose is something you really like to wear. No more putting something on then looking in the mirror disappointed then putting it back to trying something else. I'm happy with whatever I pull out.
 
The key here is you must empty out everything! I started with my closets and drawers. Then another day it was my shoes, coats and then bedding and towels.
 
Even if you are left with only a small amount, this is good because they are things that you are happy with. Not to mention; now there is plenty of room to purchase wonderful new things that you love. I tried this concept two or three times before I actually could wrap my mind around of getting rid of so much.
 
I ended up realizing some towels I had were so old, I can only guess how many years they were around. Now when I reach for a new towel, it's in great shape not old and tattered.
 
Now for the mess of items left everywhere .... Donate them!  There are so many souls out there that need clothing or charities that sell them to earn much needed funds. Some charities will even come to you and pick everything up.

NOW DONATE WHAT'S LEFT OVER!


Week 3 - Journal Prompt


Wednesday, February 8, 2017

DIY - Rope Shelves

Sometimes DIY's are the Best!!

Here is one that is going on my DIY list. Yup, I have a DIY bucket list! Doesn't everyone?

Rope shelves are amazing, there are so many ways to personalize them. Different colours, finishes, rope styles, different number of shelves, against the wall, or how about just free hanging!

Here's a wonderful tutorial I found.... try it!


They can be long.
How about just hanging free floating!
Here the wood is thicker and the shelf is made deeper.